How to Import PST to Shared Mailbox Office 365 Account? Using 4 Techniques


Are you looking for a solution to import PST to Shared mailbox Office 365 but you are not getting the complete solution on any post? No need to worry, this article will provide you with all the information that you may need. If you are a technical person, then there is good news for you, in this post, you will get the answer to this question in 3 ways.
If you are a non-technical person then you also do not need to worry as this article also describes an automated solution for you. With the help of this method, you will be able to complete this work very easily and very quickly. Let’s start our blog now!!
The idea to write an article on this question came to us from a user’s question who asked for a solution to his query on the official Microsoft website. After which when we researched this query on “how to import PST to shared mailbox Office 365”, we found more questions from other users who were facing the same issue. We have pasted the screenshots of some of those user queries below.
What is the Reason Behind Importing PST Files to Shared Mailbox?


As we all know that PST is a critical file format which is the default file format of Microsoft Outlook. But the most important concern is that its data is saved in the hard drive of your local system where there is always a risk of virus attack and malware attacks.
Furthermore, after reading the query of the user in the above screenshot, we understand that like the above user, other users are also facing the same issue and are worried about how to import PST to Shared mailbox Office 365. So that there is no loss of their data due to any reason and that data does not fall into any wrong hands.
However, not only a single user, but many organizations are also looking for a way to import their Outlook PST file to a shared mailbox so that their data can be secure and accessible to all. But the question now comes which easy methods are available to complete this task, which can be used by any technical and non-technical user. Let us now find the answers to all these questions.
Four Unique Solutions to Import PST to Shared Mailbox Office 365 Account
In this article, we will tell you four methods to import PST files to Shared mailbox, some of them are only for technical users, and the rest of the methods are for technical and non-technical users. The first solution is the network upload way which is a highly technical solution, it is only for technical users. And Second method is drive shipping method which is paid method in which you have to pay 10$ per GB.
The third method will require an MS Outlook application in which you can import single PST files in single mailboxes. The last method will be by using automatic software which can be used by any technical and non-technical user very easily. So let us now move towards the process of these four methods.
[Method 1] Import PST File to Shared Mailbox M365 Using Network Upload
Before using this method, it is necessary to keep some things in mind. Firstly, if you do not have the admin login details of the Office 365 shared mailbox, then you cannot use this method. Secondly, if you are not familiar with Office 365 admin page or you do not have technical knowledge then also you cannot use this method. If you belong to any of these regions then you can skip this method.
Steps for Network Upload Solution
Note: In this method, first of all, you have to assign the role whose steps we have mentioned below:
- First of all, go to office.com and login to your Office 365 account by entering admin login credentials. After login, select the admin option by clicking on 9 dots or you will be shown the admin option on the home page, click on it.

- After clicking on the admin option, click on 3 dots and select the role button, then click on Role Assignment

- Now the Exchange option will be showing on the right side of your screen, click on it and then select the Add Role Group option.

- Now a new screen will open in front of you, first enter your role Name, Description and click on the Next button.

- After this you have to set the permission, for this, you can also use the search bar or scroll down to find and select the Mail Recipients permission, after finding the permission, select the permission by clicking on the check box and then clicking on the Next button.

- Now in the next screen, you have to enter the email ID of the mailbox in which you want to import the PST file. After filling email address tap on the Next button.

- In the final screen of role assignments, you can review your assigned role, if you have made any mistake, you can change it by clicking on edit. If everything is correct then add your role by clicking on Add Role Group button as shown in Screenshot 1. After this, a final confirmation message will appear in front of you, when you click on the Done button as shown in the second screenshot.

Screenshot 1

Screenshot 2
Note: Now your admin role is successfully assigned. Now you have to wait for 24 hours to import PST to shared mailbox Office 365. Because after assigning a role, it takes 24 hours for the import option to become visible. After 24 hours follow the steps given below and don’t close this browser now otherwise you will have to login to your Office 365 account by entering login credentials again.
- After 24 hours, come back to Office 365 home page, and then after clicking on the 9 dots select the compliance option.

- Next, you will come to the Microsoft Purview screen, on the left panel click on the Data Lifecycle Management option and then select Microsoft 365 in the dropdown menu.

- Now, you can see the Import option on the right side of your screen panel, click on it.

- After clicking on the Import button, now click on the New Import Job option.

- Now there will be a new import job section option on your screen, first, enter the name of your job and click on the Next button.

- After this, you have to select the Upload Your Data option and then click on the Next button.

- Thereafter click on Show network upload URL and after clicking the URL that will appear, save it in Notepad. After this, you have to download the Azure application by clicking on Download Azure AzCopy.

- Now a new browser tab will open in front of you, download the file according to the bit of your system.

Note: Do not close the step 14 browser tab after clicking on Download Azure AzCopy. After this, go to the path of the zip file that has been downloaded and follow the steps continuously.
- After going to the file path, right-click on the zip file and select the option Extract to azcopy_windows_amd64_10.18.1

- After the Zip file is extracted, open it by clicking on the azcopy_windows_amd64_10.18.1 folder and then install the application by double-clicking on the azcopy.exe file.

- Now press Win + R on your keyboard and then type cmd and click on Ok. After that, the command prompt will open, after opening, copy and paste the command given below.
cd <source of azure.exe file path>
Press Enter key on your keyboard
azcopy.exe copy “<Source location of PST files>” “<SAS URL>”
Press Enter key on your keyboard

Note: On opening the Command Prompt, the C drive is selected by default. If your azure.exe file is in any other drive for example if your file is in a D drive and a C drive is selected in the command prompt then in this case you have to type d: first then type both commands. As shown in the screenshot
- After this, come back to the step 14 browser tab where you had clicked on Show Saas URL, after coming to that tab, click on the check box given in the preparer mapping file and click on the Next button.

- Now you have to download the csv sample mapping file from the link given below and fill it in according to your information. For example, we have shown in the screenshot below how to fill in the information in the mapping file.

- After filling in the information in the CSV mapping file, come back to the Microsoft purview screen and click on the Upload file option.

- After tapping on the option with the upload file, a new tab will open, in which you have to browse your CSV mapping file and tap the OK button.

- After browsing the csv mapping file, click on the validate button, which it will take a few seconds, and analyze your file.

- If there is no error in your file and you have filled all the information correctly, then your file name will turn green. Then click on the Next button. As shown in the Screenshot

- After clicking on the Next button, the Review tab will open on your system, in which you can check all your information. If any information is not correct then you can correct the information by clicking on the back button otherwise you can click the submit button.

- When this whole process will be completed without any error, after that the successful completion message will be shown, in that you have to click on Done.

- After clicking on done, you will automatically reach the screen with step 10. After reaching, if the status column is written as ‘Analysis Complete’, then click on that checkbox and select that file. After that click on Import to Office 365 option.

- Now the filter screen will open in front of you, you have two options, yes I want to filter it before importing and no I want to import everything, you can select either of these two options. Then press the Next button.

- Now click on the submit button in the review screen as shown in Screenshot 3 and after that, a successful message will appear in front of you, click on Done as shown in Screenshot 4.

Screenshot 3

Screenshot 4
- Now PST has been imported to Shared mailbox Office 365 now you can preview your data by login into your Office 365 account and then clicking the Outlook option.

Drawbacks of Network Upload Manual Solution
- To finish the procedure of importing PST files to shared mailbox Office 365, you must go through several steps.
- This method takes a lot of time and effort, and it also needs technical expertise to complete all the steps.
- A maximum of 20 GB PST file can be imported using the network upload technique to a shared mailbox in M365.
- Using PowerShell scripts and commands to import PST to shared mailbox Office 365 may provide challenges, and your PST files may become damaged.

[Method 2] Import PST to Shared Mailbox Office 365 Using Drive Shipping Method
Note: To use this method, you have to follow the same from step 1 to step 12 of the method first. After that continue the below steps:
Steps13: After entering the name of the job, two options appear in front of you, Upload your data and Ship Hard Drive to One of your Physical Locations, out of which you have to select the second option.

Steps14: Your source PST file should be shipped and sent to Microsoft Corporation.
Steps15: Request that Microsoft add PST to Azure Storage.
Steps16: After that, Microsoft will check your PST file.
Steps17: Microsoft will charge $2 after verification for 1 GB of data storage.
Limitation of Drive Shipping Method
- It is not helpful for all customers globally that Microsoft offers a drive delivery option that is only accessible in a few countries.
- Microsoft will charge a whopping $2000 for 1 TB of data if you are exporting several bulk PST files to a shared mailbox in an M365 account.
- To import them into a shared mailbox account, the size of the original PST file should not exceed 20 GB.
- Microsoft forbids you from importing a PST file using the disc shipment method if it has more than 300 folders and subfolders.
[Method 3] Using Outlook Application for Import PST Files to Shared Mailbox
Note: To import PST to Shared Mailbox Office 365 with the help of this method, first, you need to configure Office 365 account in the MS Outlook application and after that, you can import PST files to Shared Mailbox O365 account.
Phase 1: Configure Microsoft 365 Shared Mailbox Account into MS Outlook Application
- Launch the Outlook desktop email client on your computer.
- To proceed, click the File icon and then select Add Account.
- Click Connect after entering the shared mailbox address for Office 365.
- Enter the password for your shared mailbox, then click Sign In.
- Click the Ok button after finishing the account configuration.
- Emails from shared mailboxes may now be seen and received in Outlook.
Phase 2: Import PST into Shared Mailbox Office 365 by Import/Export Option
- First, open the MS Outlook email client application on your system. Click the File tab after that.
- Next, choose Import/Export Wizard from the Open category.

- Select Import from another program or file in the Import and Export Wizard, then click Next.

- Next, choose Next after choosing Outlook Data File (.pst).

- You may either select Browse to choose the file to import, then click Next, or you can type the location and name of the .pst file that you wish to import.

- Choose the import folder you wish to use. Select the top of the hierarchy, then click Finish to import every item in the .pst file.

Limitations of Using Outlook Application Manual Solution
- As you can see, this approach necessitates complicated settings, and in order to do so, your machine must have desktop-based Outlook installed.
- To start, the procedure is very lengthy.
- It is absolutely not a good strategy if you have files that are TB in size. Because it might take much more time than normal.
[Method 4] Using Automatic Tool to Import Outlook PST Files into Shared Mailbox O365
One of the easiest and best ways to import PST to shared mailbox Office 365 which comes with no limitations is Turgs PST to Office 365 Migration Tool. With the help of this tool, any user can complete this task very easily and its graphical interface is also very easy to use. All you need only is the login credentials of the Office 365 admin account to use this tool. With the help of this software, you can also import corrupted PST files to Shared mailbox. Let us now know the steps to use this software.
Complete & Easiest Process to Import PST to Shared Mailbox
- Download, install & run the PST to Shared Mailbox Office 365 Backup Software on any Windows or Mac system

- After that, choose the Select Folder/Select File option as per your requirements and then browse the PST files

- After browsing, choose the required folder according to your choice and then tap the Next button

- Now, select the Office 365 option as a saving option in the drop-down menu

- Enter the Office 365 admin login detail and then press the Connect button

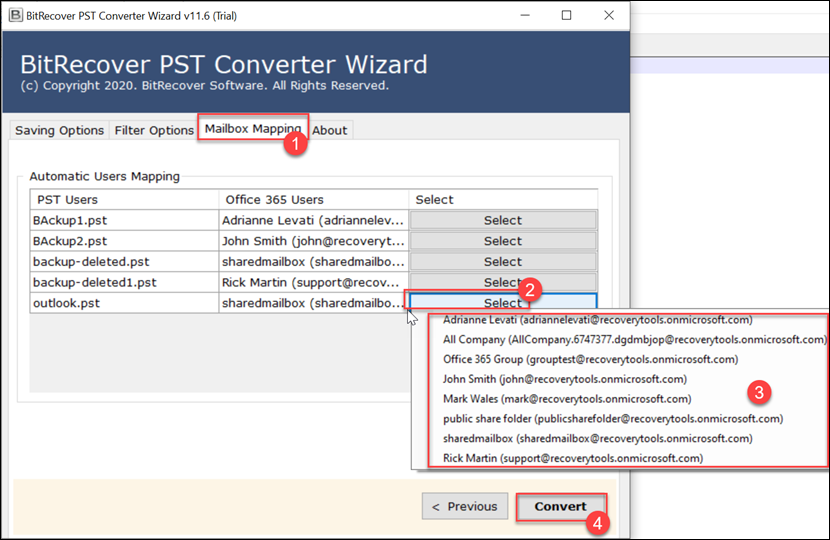
- Finally, select the mailbox in which you want to import PST files, and then press the Convert button
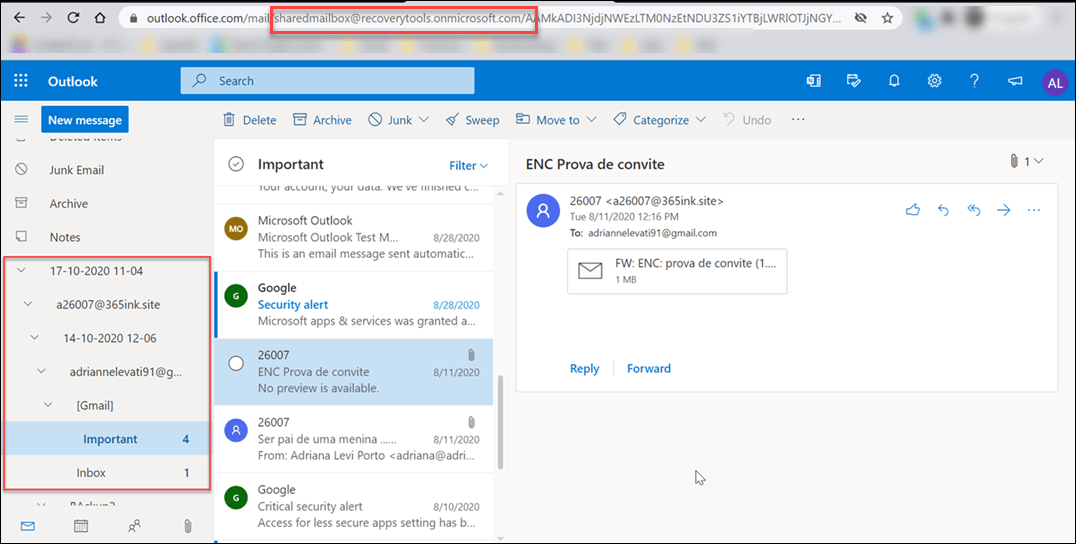
- Now, your PST file has been imported into your Shared mailbox Office 365 account, you can see your data after login Office 365 account
Advanced Feature of this Automatic Software
- If you have damaged PST files then you can also repair PST files with the help of the recovery mode button in this software.
- Importing multiple Outlook PST files to the shared mailbox M365 account is neither size nor number restricted. PST files with connected shared mailbox Office 365 accounts can be mapped even by users.
- When importing PST folders into an Office 365 shared mailbox account, you can select or unselect particular PST folders. Avoiding unused directories for importing is helpful with this.
- By date range, email address, subject, exclude folders, add event organizer, and modify root folder name, among other advanced filter settings, the application allows you to import PST to shared mailbox Office 365.
Frequently Asked Questions
Ques. To import a PST file into an Office 365 shared mailbox, which permissions are required?
Ans. You require the Mail Recipients role to be given to your account in order to import a PST file into a shared mailbox in Office 365. Using PowerShell or the Exchange admin center, you may assign this role.
Ques. Can I use network upload for transferring the file’s specified category?
Ans. No, when importing a PST file to Office 365’s Shared Mailbox, there is no ability to filter out the PST file’s data.
Ques. Can I use Network Upload to import just new emails from a PST file?
Ans. No, incremental migration is not a feature of network upload. For this, you might use the automatic software.
Ques. Which way to import PST files to shared mailbox Office 365 is straightforward to use and expert-recommended?
Ans. The simplest and most recommended method to import PST files to shared mailbox accounts is to use an automated solution.
Conclusion
In this article, we have described 4 methods to import PST to shared mailbox Office 365, out of which you can use any method as per your requirement. If you are a technical user then you can go for the first method or second method. If you do not have much technical knowledge, then you can use the third method. The last method is for all those users who do not have technical knowledge at all. But this method can be used by all users because its recommendation is also given by experts.